About Tab
The user interface of the plugin always has an About tab containing:
- the plugin description
- the plugin version number
- a list of all the category and board components for your plugin
Using the About tab, users can selectively choose which category or board the respective components apply to.
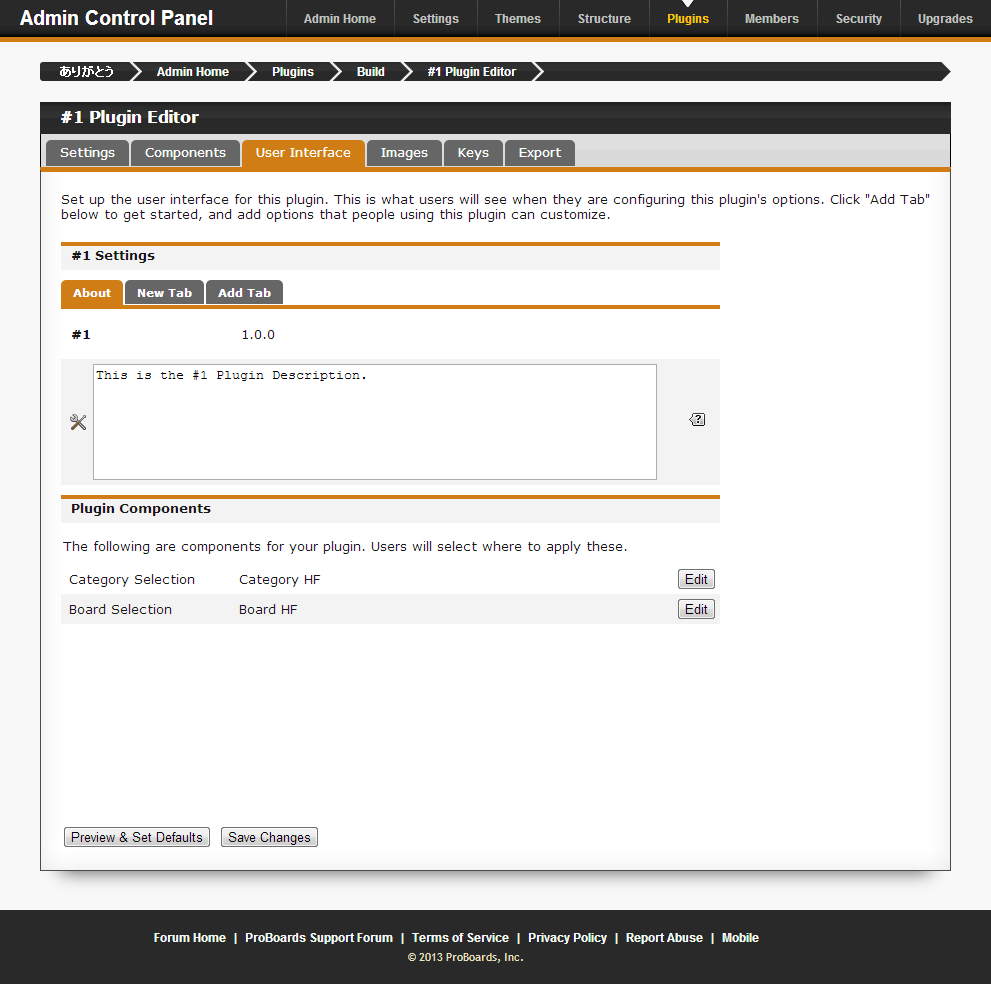
Adding Additional Setting Tabs
You likely want to give plugin users an easy way to customize the plugin's settings. This is easily achieved by using the plugin editor to build a custom user interface for the plugin.
Begin by looking a little farther down and finding the About and Add Tab tabs. Select Add Tab, then enter a name for the new tab that will describe the category of options you'll place within it (for example, if the options are specific to images, the tab name could be Image Settings). You can add as many tabs as you want, but we recommend using a minimal amount of tabs so the plugin is easier to navigate.
In the right sidebar, there are several different Form Fields you can use as your plugin's options.
- Field - A simple bar to type a short amount of text into.
- Text Area - A large area with a scrollbar for longer blocks of text.
- Color Field - A hex color selector, similar to the one in the Themes area.
- Selection - Dropdown menus, checkboxes, and radio buttons that can be changed to allow you to select only one option or select multiple options.
- Sortable List - A list of preset options that can be reordered. You can also add checkboxes to these options to enable or disable them individually.
- Image Select - Allows you to select from images you've uploaded to your plugin from the Images tab.
- Forum Search - Allows you to choose from existing Members, Boards, Categories, Themes, and Custom Pages on your forum.
- Key Permissions - Chooses which members can affect your plugin's keys.
- Code Box - Similar to a text area, but displays codes and scripts in a format that's easier to read.
- Auto Form - Can have all of the above fields added to it (except for key permissions), and creates a new row of those same fields every time you've filled a row. Can also be reordered like a sortable list.


Most form fields contain at least three options: Title, Variable ID, and Description.
- Title is the text that displays to the left of your field similar to how they look in the User Interface settings. This is useful for naming your fields so users have a general idea of what your field is for.
- Variable ID is the unique ID the plugin option will be addressed by in its coding. No two fields in your plugin can have the same ID.
- Description helps explain the purpose of the field. Any text entered in the Description area will display next to your field in the form of a
 icon. Hovering your mouse over this icon will display the description text for your field. Description text is a good way of providing detailed instruction on how to use any particular field to anyone using your plugin.
There are several more options that will be visible depending on which field you choose. Many of these have their own
icons next to them to aid you in understanding what they're used for in that specific field.Another way of formatting and describing your plugin is through the use of the Author Tools , also located in the right sidebar. These can be used to add plain text directly into your plugin's form. The Title Bar is a bold heading with a line that crosses the page. It's useful for giving a tab within your plugin its own sub-categories and keeping your plugin's visual appearance tidy. Bold Text is a good way to emphasize a paragraph of plain text you feel is important for anyone using the plugin to read. Plain Text is regular, unformatted text that can be used to contain a description of any particular section of your plugin's settings.
Try to utilize fields and text properly to make your plugin as user-friendly and accessible as possible.